
Photo by Choong Deng Xiang on Unsplash
The Ultimate NFTs Masterclass - All you need to know about NFTs with special bonus content


Table of contents
- What are we building 🤔 ?
- What are nfts
- ERC-721 and ERC-1155
- Writing the smart contract
- Understanding URI & IPFS
- Minting our NFT
- Validating on opensea
- Complete and Celebrate
- The NFT marketplace -Basic skeleton contract
- Creating a new NFT on the marketplace for sale
- Selling the NFT
- Some Advanced functions
- The last lesson
In this course you will learn all about NFTs i.e. Non Fungible Tokens from Creation to listing it on Opensea & as a bonus you will also learn how to write a NFT marketplace smart contract.
What are we building 🤔 ?
GM Buidlers
I welcome you to this brand new course on NFTs a-z
Here in this course you will learn all about NFTs.
From making a NFT to uploading it on the decentralized web to listing it for sale ,we have got it all covered .
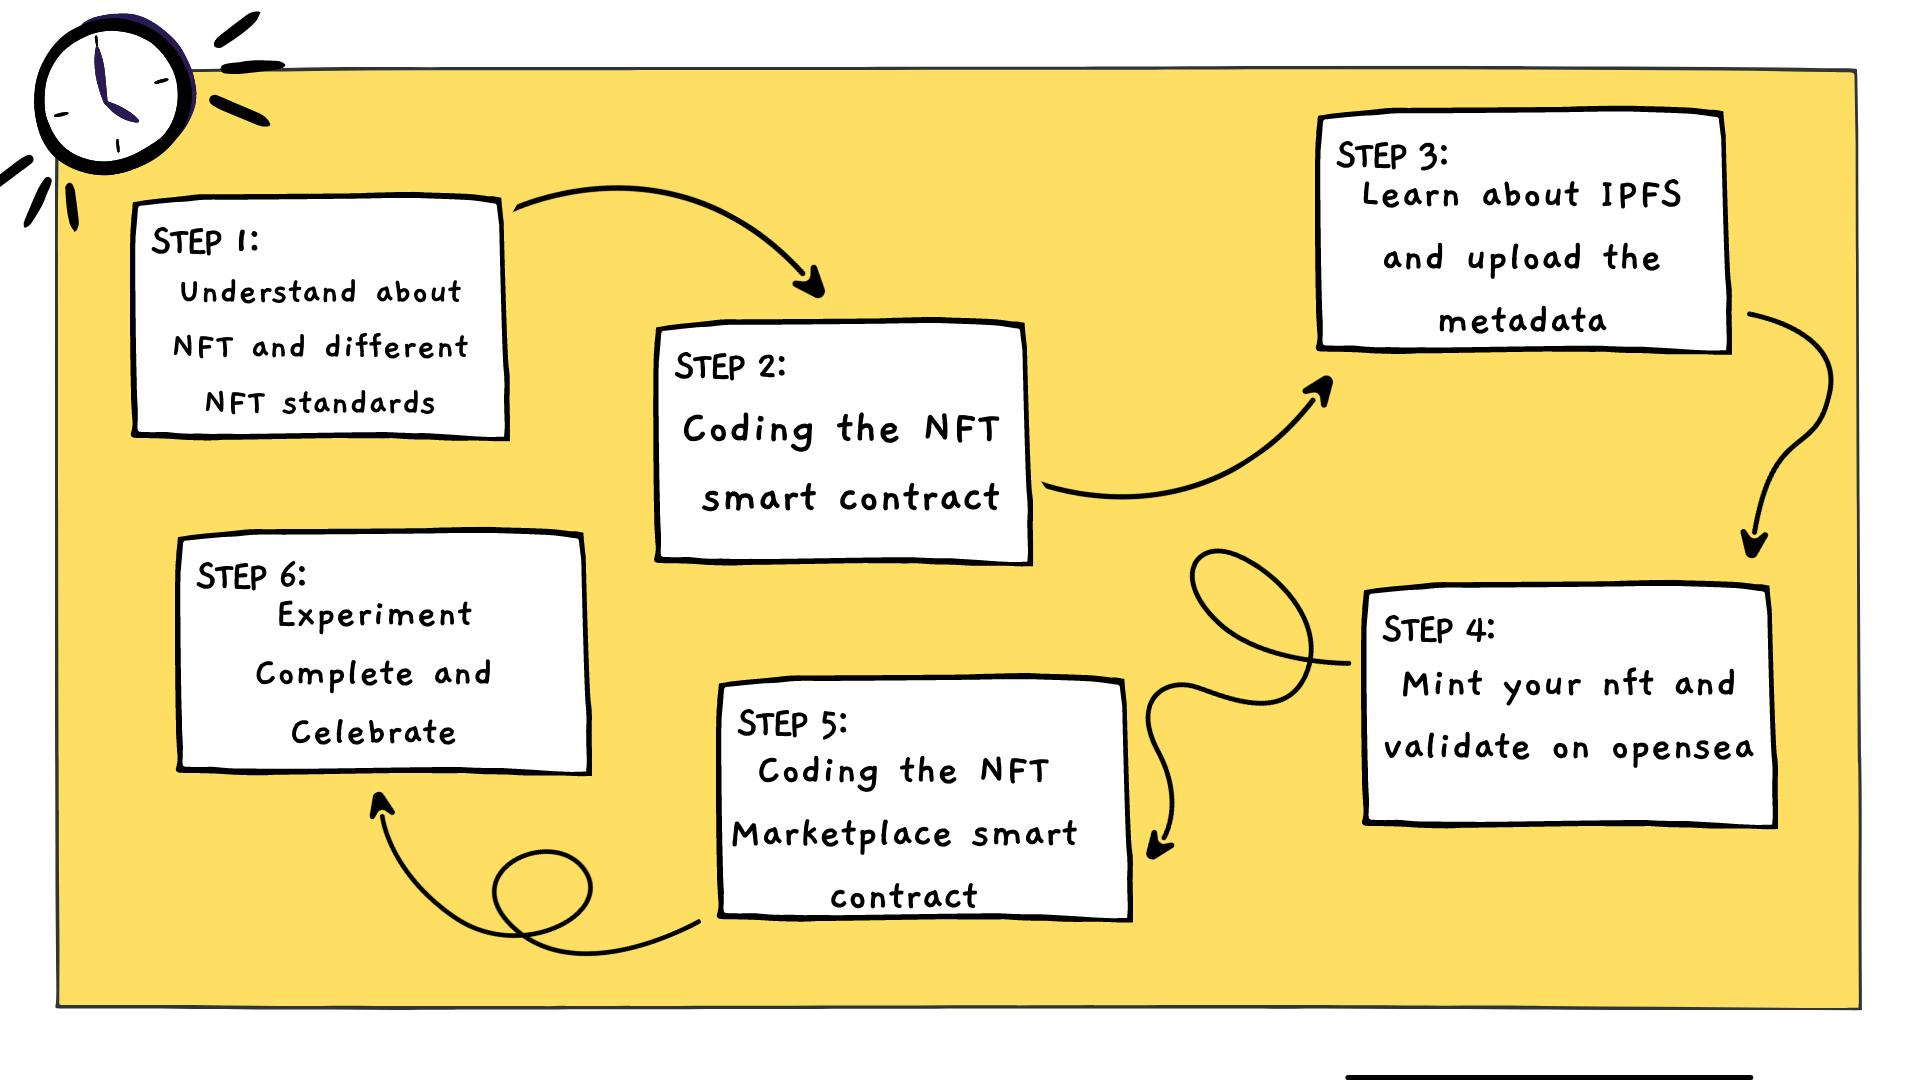
We will start with a brief introduction of what are NFTs exactly ,then we will head on to learning uploading our NFT on IPFS so that it stays on the web forever then we will learn about the ERC standards for non fungible tokens that are ERC-721 and ERC-1155 and learn about differences between these two standards. Then we will make write an ERC-721 contract and mint our first ever NFT , Isn’t it awesome ,are you excited .
When our nft gets minted we will able to see our nft on opensea .
and it’s not all ,
After this NFT masterclass we will learn how to WRITE a NFT marketplace smart contract with functionalities like listing our NFTs for selling, Buy NFTs and able to see all of our NFTs all written in solidity so as to solidify 😉 our knowledge
Woosh ! It’s going to be one hell of a ride ,
So are you ready, buckle up and let’s go !
What are nfts
NFT stands for non fungible token ,unlike erc 20 tokens which can be exchanged with each other and have same value but NFTs are non fungible means they carry some unique value in themselves.
“Non-fungible” means that it’s unique and can’t be replaced with something else. For example, a bitcoin is fungible — trade one for another bitcoin, and you’ll have exactly the same thing.
But a one-of-a-kind trading card, is non-fungible. If you traded it for a different card, you’d have something completely different.
Non-fungible Tokens (NFTs) are what brands look like in Web 3.0. They are digital assets that reflect ownership of tangible and intangible items, like collectable sports cards, virtual real estate and even digital sneakers.
One of the most significant advantages of owning a digital collectable over a physical collectable, is that each NFT carries unique information that makes it easily distinguishable from other NFTs. Each item can be traced back to the original issuer, stopping the fabrication and circulation of false collectables in its tracks.
Nowadays we know the usecases of NFTs as a digital art or a game collectible but the possibilities it has are phenomenal,
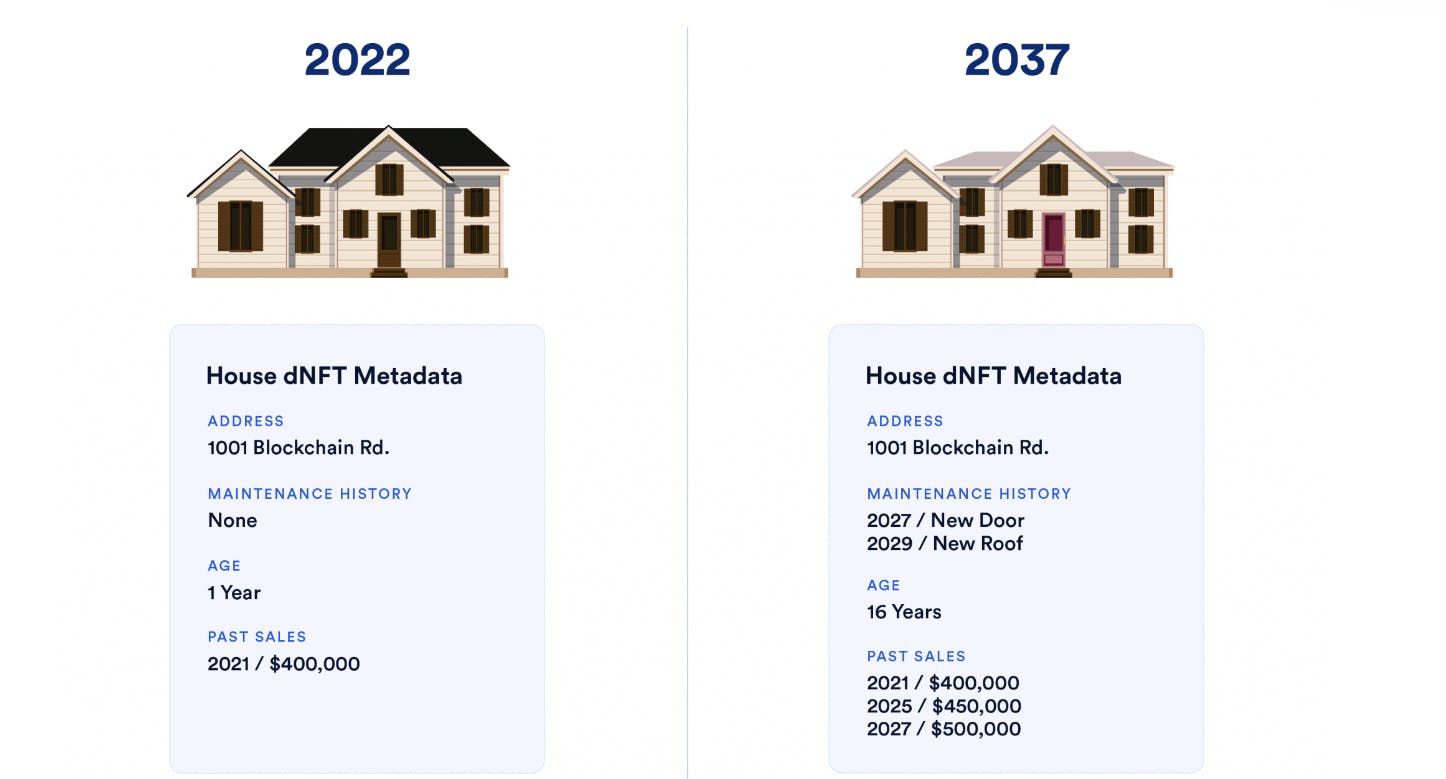
One of the usecases of nft can be registry of homes ,today when we buy a home we have to go through so much paperwork to transfer the ownership of house from the previous owner to us but with NFTs this can be done in just a matter of seconds like this .
Now we have understood what NFTs are and why are they important let’s look at how to make one.
ERC-721 and ERC-1155
There are primarily two erc standards for coding or making a nft that are erc721 and erc 1155
Let’s understand them one by one
Take a look at this nft
https://testnets.opensea.io/assets/rinkeby/0xe5b9a1d7cd366626989fb9448db740852a8014fc/1
Scroll down and have a look at the details of this nft , you will see that the token standard of this nft is ERC 721.
Now have a look at this nft
the token standard of this nft is ERC 1155
This is because the nft with token standard erc 721 is made by writing code for erc 721 and deploying the nft smart contract from our side and then minting it .
That’s why when we go to the etherscan of erc 721 nft
https://rinkeby.etherscan.io/address/0xe5b9a1d7cd366626989fb9448db740852a8014fc
We can see that the tracker is sid nft and this is the name we have given in our smart contract while deploying it
But when we look at the etherscan of erc 1155 nft
https://rinkeby.etherscan.io/address/0x88b48f654c30e99bc2e4a1559b4dcf1ad93fa656
we can see that its tracker is opensea collections ,it means that our nft is minted on opensea contract and this is the reason we don’t have to pay any gas fees while listing it on opensea but for minting the erc 721 nft we have paid some gas fees.
and this is the main defining feature of erc 1155 which is gasless transactions
ERC 1155 is a multi token standard, just like erc 20 is used for making tokens and erc 721 is for NFTs whereas ERC 1155 can be used for both
- ERC-1155 also allows batch transfers of tokens, which can reduce transaction costs and times. With ERC-721, if you want to send multiple tokens, they happen individually.
- ERC-1155’s smart contracts support an infinite number of tokens, whereas ERC-721 needs a new smart contract for each type of token. v
- ERC-1155 permits the creation of both semi-fungible tokens and non-fungible tokens, whereas ERC-721 permits only the latter.
You can read more about ERC-721 vs ERC-1155 here :
https://www.web3.university/article/comparing-erc-721-to-erc-1155
Writing the smart contract
Let’s write ERC-721 smart contract for NFTs
For the coding part we will use remix ,Remix is a browser based IDE with built in solidity compiler so it will be easy and convenient to use.
Head over to remix.ethereum.org and in the contracts directory make a new file named NFT.sol
.sol is the extension for solidity files.
We will not write the contract from scratch because we have openzeppelin ,Openzeppelin is the biggest library of smart contracts so we will use this and this will save us so much time and the process becomes so much convenient
Step-1 : Make a new file named NFT.sol
Step -2: Start with declaring the license identifier and pragma solidity version
// SPDX-License-Identifier: MIT
pragma solidity 0.8.0;
Step -3 : After writing these ,copy and paste these two lines ,these lines are for inheriting from the openzepellin smart contract.
import "https://github.com/0xcert/ethereum-erc721/src/contracts/tokens/nf-token-metadata.sol";
import "https://github.com/0xcert/ethereum-erc721/src/contracts/ownership/ownable.sol";
Step-4 : Declare your contract and inherit from the ownable and metadata erc -721 contract
contract newNFT is NFTokenMetadata, Ownable {
}
Step-5 : Under the contract make a constructor and in the constructor declare the name and symbol for your nft, Give your nft collection the name you want
constructor() {
    nftName = " ";
    nftSymbol = "";
  }
Step 5: Now let’s write the mint function
function mint(address _to, uint256 _tokenId, string calldata _uri) external onlyOwner {
    super._mint(_to, _tokenId);
    super._setTokenUri(_tokenId, _uri);
  }
The mint function takes the address of the nft owner, uri of nft and token id as parameters and mints a nft .We will understand more about uri in the next chapter
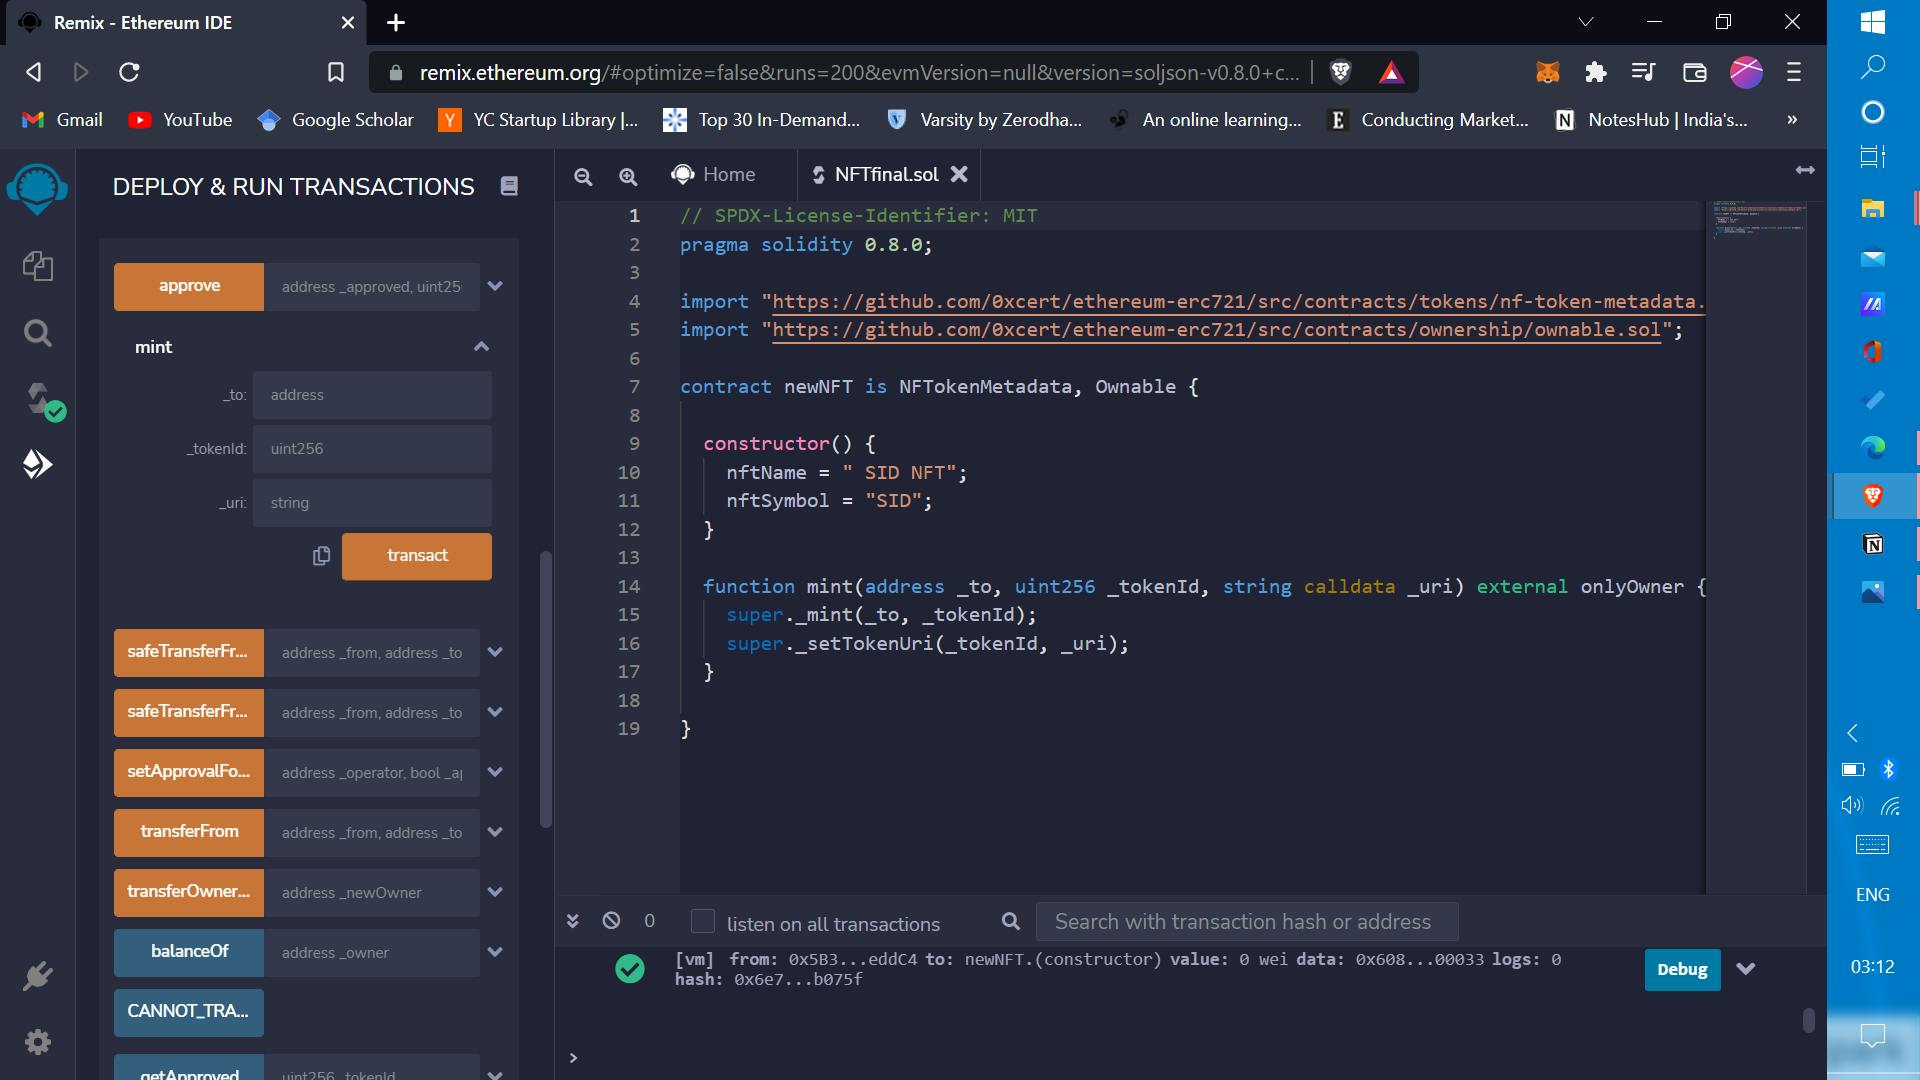
Step-6 : That’s all our smart contract is complete , this is the magic of inheriting from openzepellin ,with just some lines we have written our ERC-721 smart contract . The full code for your reference is
// SPDX-License-Identifier: MIT
pragma solidity 0.8.0;

import "https://github.com/0xcert/ethereum-erc721/src/contracts/tokens/nf-token-metadata.sol";
import "https://github.com/0xcert/ethereum-erc721/src/contracts/ownership/ownable.sol";

contract newNFT is NFTokenMetadata, Ownable {

  constructor() {
    nftName = " SID NFT";
    nftSymbol = "SID";
  }

  function mint(address _to, uint256 _tokenId, string calldata _uri) external onlyOwner {
    super._mint(_to, _tokenId);
    super._setTokenUri(_tokenId, _uri);
  }

}
Step-7: Now let’s compile our contract .For compilation press the third button in the sidebar and compile NFT.sol .
Step-8: Now is the time to deploy our smart contract on the testnet .
- For deploying our contract , press the fourth button “Deploy & run transactions” from the sidebar.
- For the environment select the injected web3 from the dropdown menu , a metamask popup will appear , press the connect button and connect your wallet to remix .
Change your network to rinkeby testnet and for deploying you will need some rinkeby test eth .
You can get your test eth from rinkeby faucet from here : https://rinkebyfaucet.com/
Press the orange deploy button and deploy your contract a metamask popup will appear to confirm your transaction . Press confirm and you will see in the progress bar that you will see the message “creation of new nft pending ” and after some time your contract will be deployed and you can confirm it by going to its etherscan link.
Step-9: After deploying our smart contract,now is the time to mint a nft but before that we have to host our nft on ipfs and get our uri.
So let’s go
Understanding URI & IPFS
Now let’s understand IPFS
IPFS stands for interplanetary file system and it **is a distributed system for storing and accessing files, websites, applications, and data.
In simple words it is the web3 way to host your files on the web .
IPFS uses a content-addressed system instead of the location-based system that HTTP uses.
For example, if a website you’re trying to visit is attacked, its domain expires, or its server goes down... you would be out of luck. With IPFS, you would still be able to serve up the same website from somewhere else. Thanks to the ability for files to come from many places, it is harder for anyone to block and censor data or content.
I think this much information about IPFS is sufficient for now if you want to know more about IPFS you can read more about that here :
https://docs.ipfs.io/concepts/what-is-ipfs/
Why we choose IPFS for NFTs
Now a common question arises that why we chosen IPFS for NFTs
So first lets see what all a NFT contains .A typical NFT points to a JSON file which has NFTs name , its description and a URL to the file it can be a photo, video, document anything and this URL is the most important part.
So, if a NFT contains an HTTP URL that points to a location of data somewhere on the internet. This is problematic for supposedly immutable assets. Who is running the server? What happens if that server goes down? What if that data is deleted? What if it sends the incorrect data?
With HTTP URLs, there must be trust that the service provider remains uncompromised and that the content they serve is actually the content being searched for. Even though the token part of an NFT is on a blockchain, the asset is only as good as its weakest link.
This is where IPFS can help. IPFS enables users to store and retrieve content based on a “fingerprint” of the content itself (a cryptographic hash called a CID). By putting an IPFS CID in an NFT, that NFT directly references the data itself rather than a brittle HTTP link.
Why only JSON metadata
When I first read about NFTs this question also lingered in my mind, that why the NFT points to a JSON file and not to the actual data.
And this is because we know that uploading data on blockchain is expensive and files are big ,every file upload on blockchain will cost some high very very high gas fees so for avoiding this problem we host our nft off chain and host its metadata it means the information of nft on-chain. and it means our nft will contain the uri . URI stands for Universal Resource Identifier. Think of it as an URL, through which you can get all metadata associated with the NFT. The metadata can be image URL, description, attributes, etc.
Uploading on IPFS
Lets start by uploading our asset which we want to make an nft on ipfs.
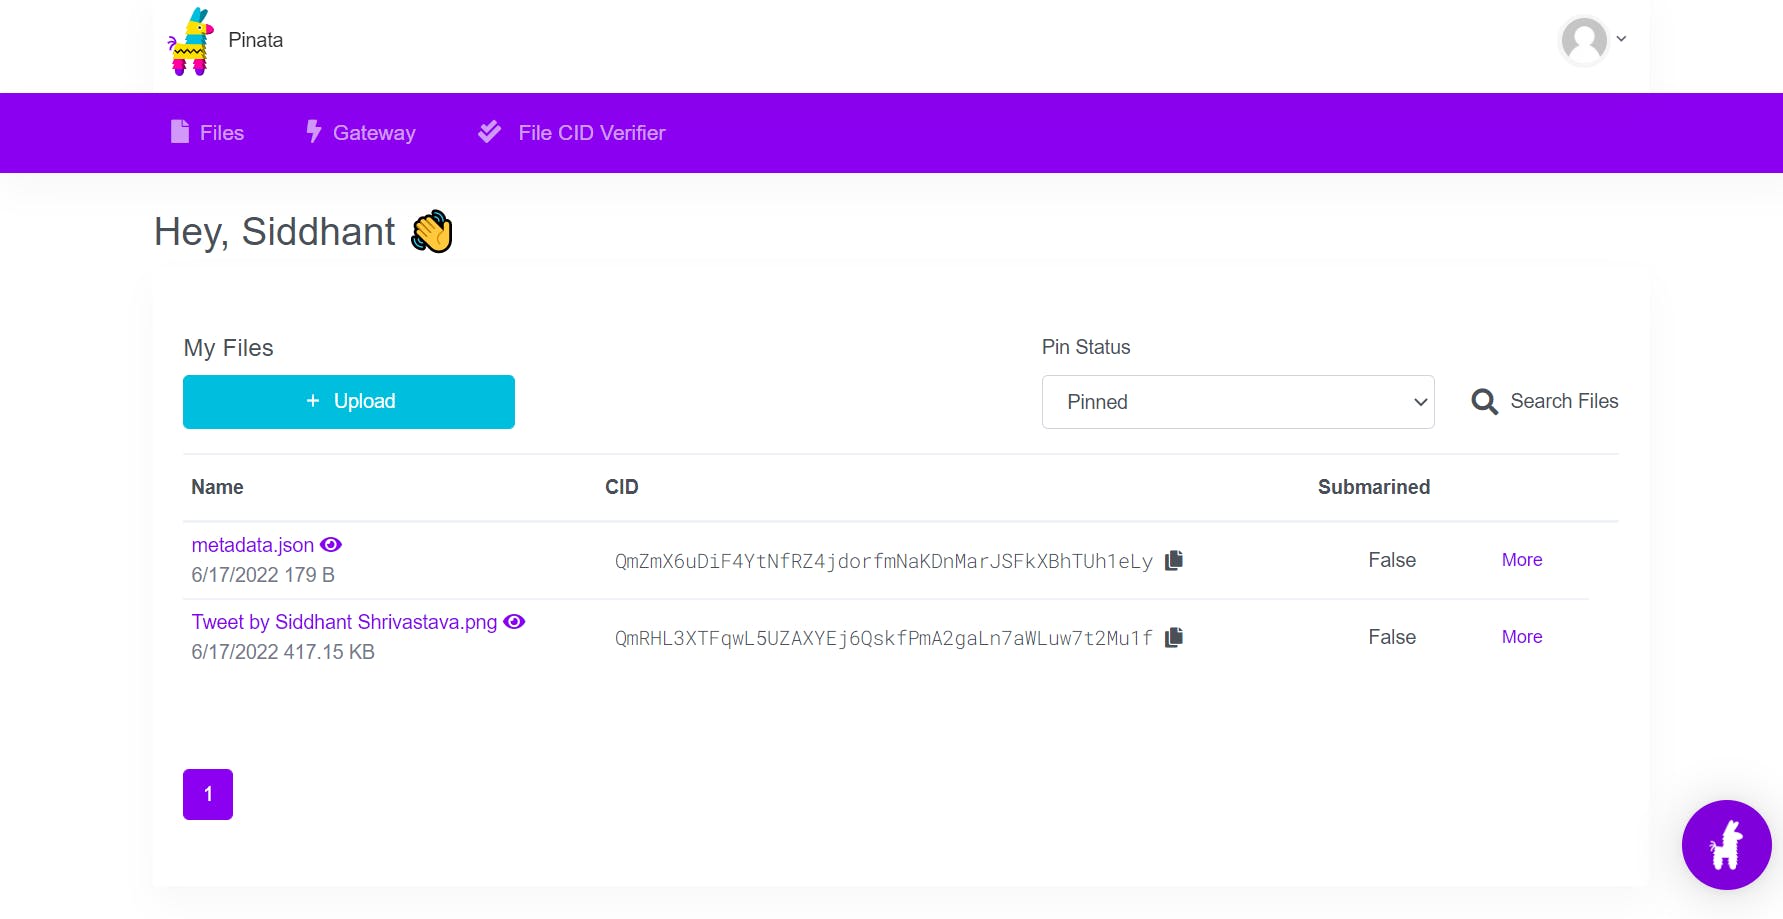
For hosting our image on IPFS we will use pinata ,Pinata is for pinning our files on IPFS
Step-1 : Head over to https://www.pinata.cloud/ and login .
Step-2 : On the pinata dashboard , click on the upload button and upload your desired file on pinata.
Step-3 : Copy the cid of your uploaded file and paste it in the following link
"https://ipfs.io/ipfs/Paste-the-CID-here" and copy the link.
Step-4 : Now make a new json file in your computer and paste the following information in it .
{
"name": "Write the name of your nft ",
"description": "Write the description for your nft",
"image": "Paste the ipfs link that we copied in step-3"
}
Step-5 : Save the json file .
Step-6 : Upload your saved json file on pinata and copy the cid.
Step-7 : Now paste the cid in the following link and copy the link
"https://ipfs.io/ipfs/Paste-the-CID-here" .This is our NFT’s URI.
Minting our NFT
Now let’s mint our NFT ,
In the deploy section scroll down and click the toggle button of transactions recorded and in the mint button start filling our the details for minting our nft
In the to section -fill it out with your contract address
In the token id - enter 1 as this keep track of the no of NFTs in our NFT collection and this is our first NFT
In the uri section paste the link that we have copied .
Then press the mint button .
A metamask popup will appear , confirm the transaction and from the dropdown menu you can see that your NFT is minted .
View your transaction on Etherscan and copy the contract address of your minted NFT
Validating on opensea
Now that we have minted our NFT successfully
Let’s see our NFT in full action on opensea so that we can trade our NFT and show it to others.
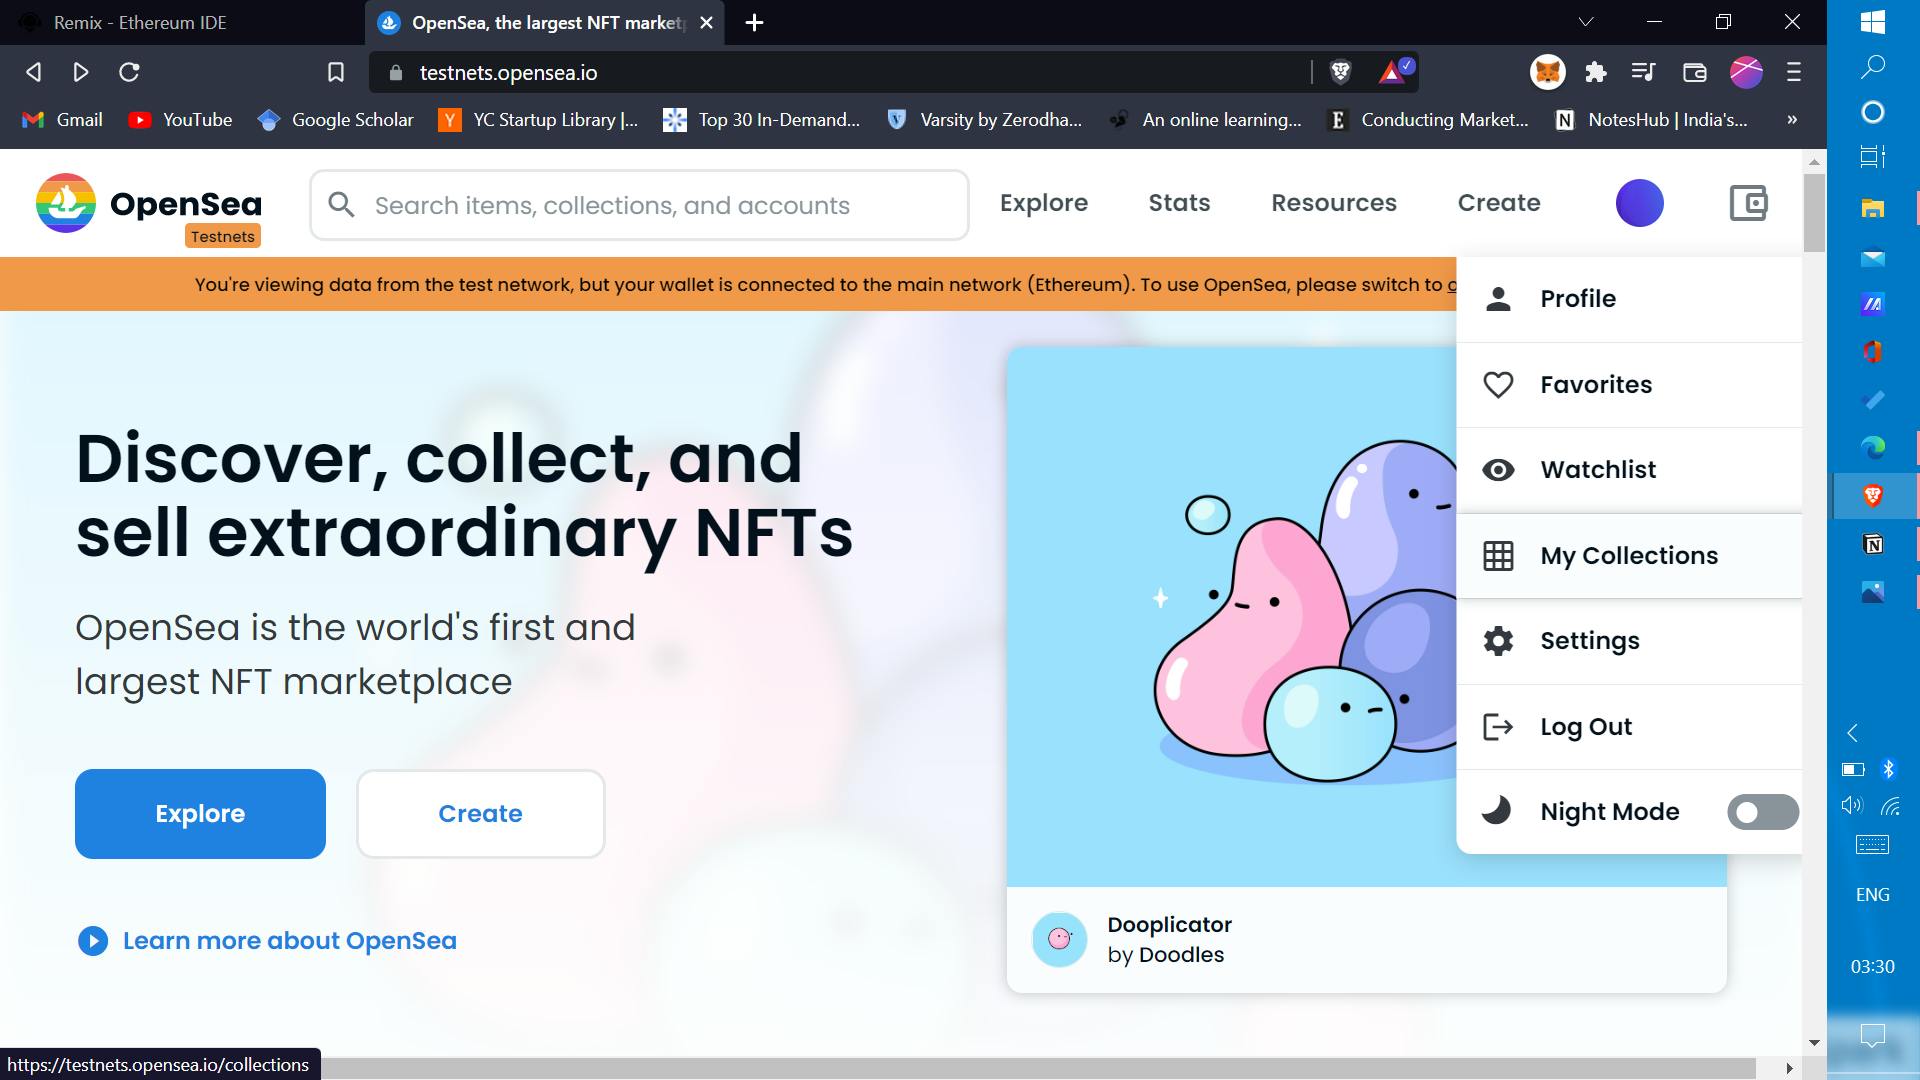
Go to https://testnets.opensea.io/ and connect your wallet .
Now click the profile button and go to my collections
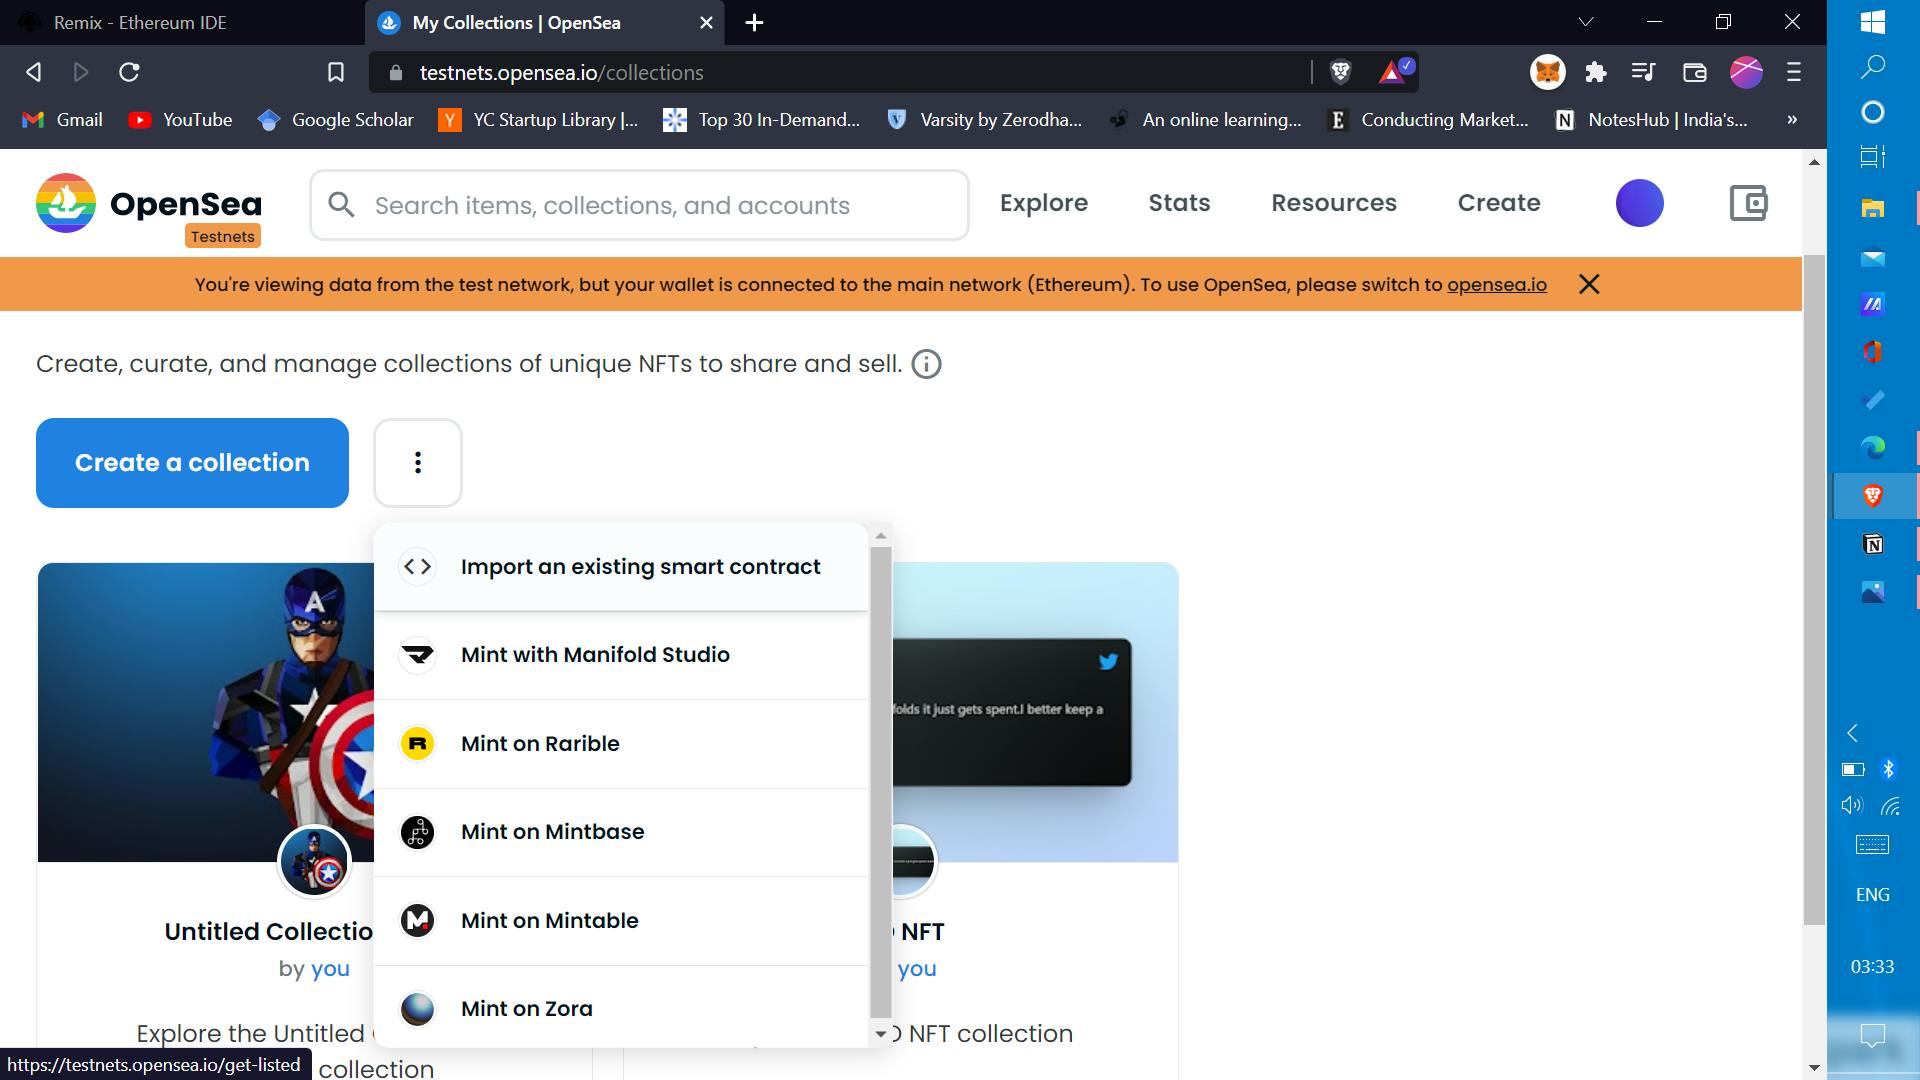
Now in the mycollections tab click on the three dots or the kebab menu and select import an existing smart contract.
Now select the chain ,in our case it is rinkeby and enter the minted NFT’s contract address that you copied in the mint NFT chapter .
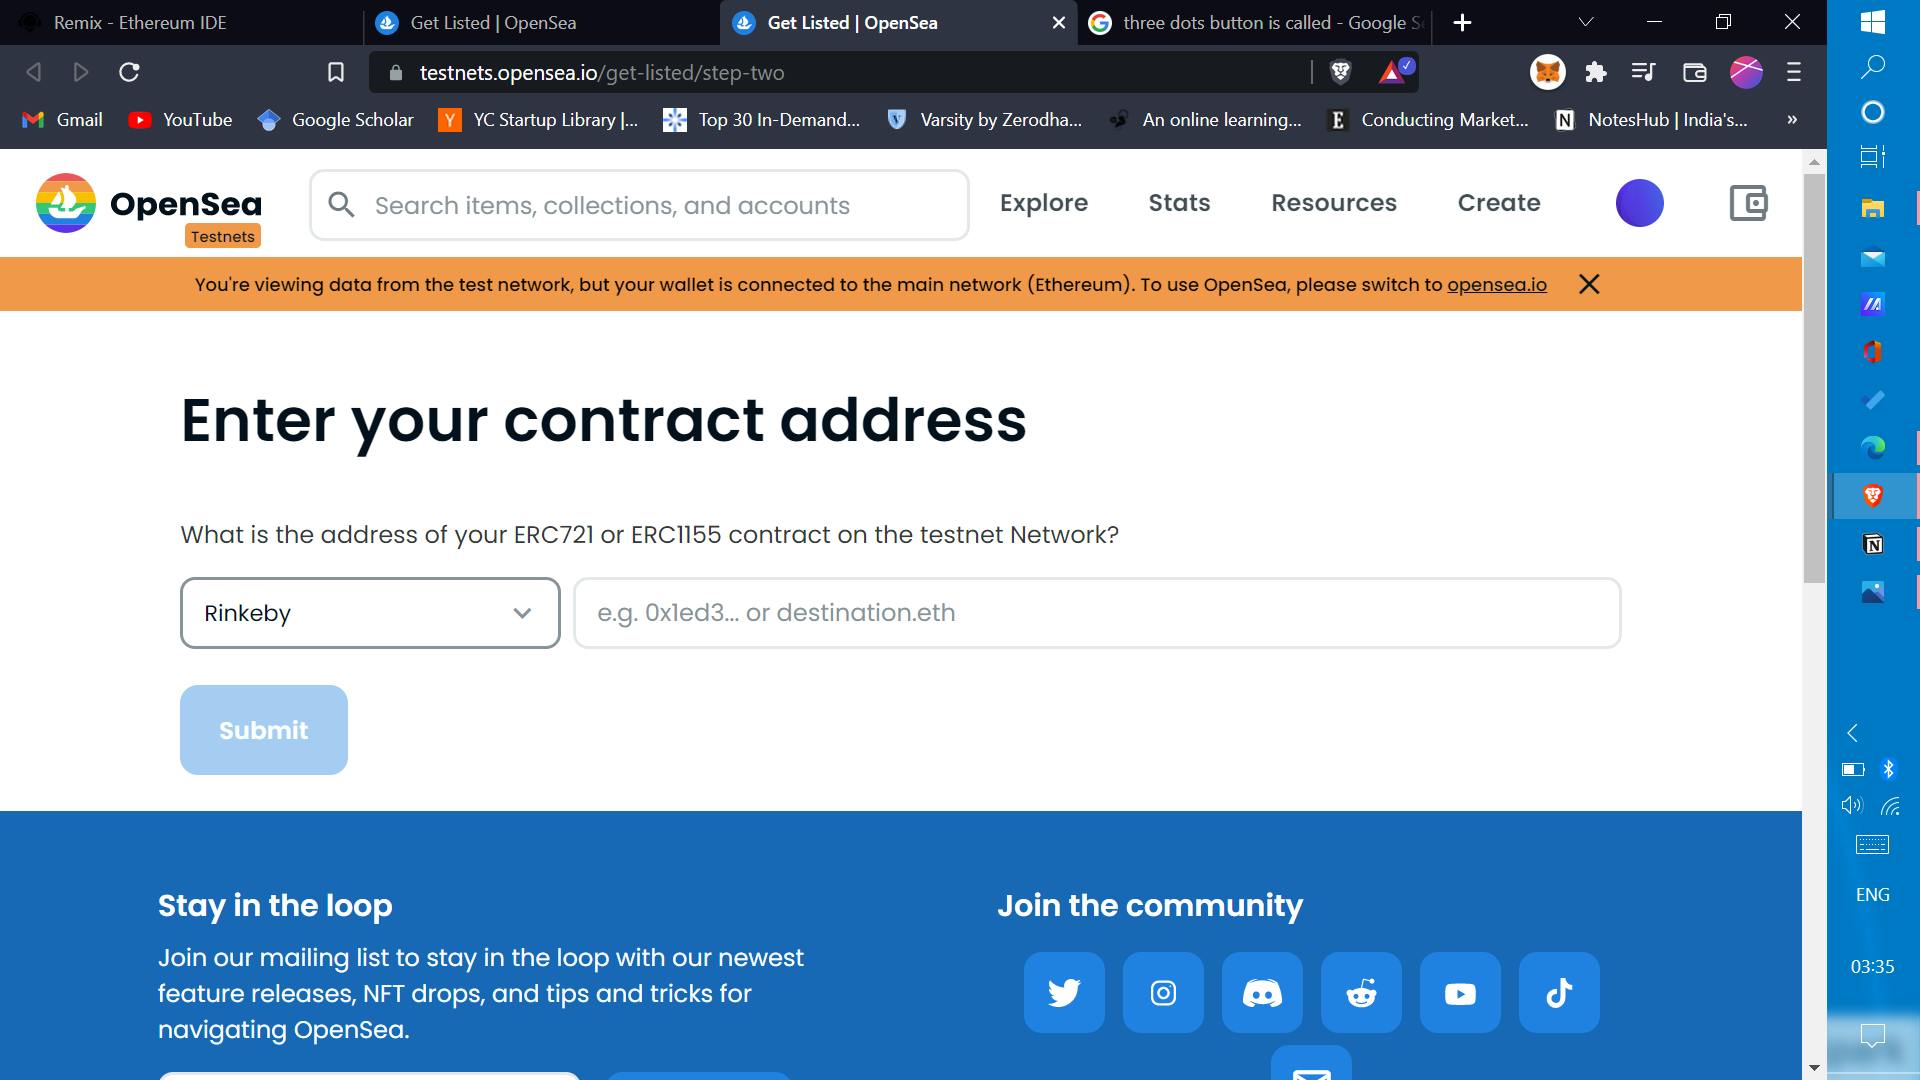
and click on submit .
voila you just listed your first nft on opensea .
Complete and Celebrate
Wow we have done it we have made our nft collection deployed it and minted our first nft of the collection and listed it on opensea.
It is a big feat share this achievement with your friends and don’t forget to tag Dapp world @sidtexh in your tweets.
But it is not over yet , we have listed our NFT on opensea but now we will proceed on to learning what goes on the backend of the nft marketplace websites like opensea .
We will look at how to write a NFT Marketplace smart contract and it will help us to become a more pro coder in solidity and gives us more knowledge in web 3 development .
So are you ready Let’s go
The NFT marketplace -Basic skeleton contract
Let’s start by making the basic structure of the NFT marketplace contract
// SPDX-License-Identifier: MIT
pragma solidity ^0.8.4;

import "@openzeppelin/contracts/token/ERC721/IERC721.sol";
import "@openzeppelin/contracts/utils/Counters.sol";
import "@openzeppelin/contracts/security/ReentrancyGuard.sol";
Start by specifying the license identifier and pragma solidity version.
After then import openzeppelin contract for ERC 721 and reentrancy guard because our marketplace contract will deal with money so as to save our marketplace from a reentrancy attack we need to apply reentrancy guard in our contract.
To know more about Reentrancy attack read here : https://quantstamp.com/blog/what-is-a-re-entrancy-attack
contract Marketplace is ReentrancyGuard {

    using Counters for Counters.Counter;
    Counters.Counter private _tokenIds;
    Counters.Counter private _itemsSold;

    uint256 listingPrice = 0.010 ether;
    address payable owner;

    mapping(uint256 => MarketItem) private idToMarketItem;
}
- We have created a marketplace contract inheriting the reentrancy guard from openzeppelin
- The two counters are for keeping a track of how many nfts are created and out of them how many got sold on the marketplace
- The listing price is the commission that the marketplace charges for being the intermediary between the seller and the buyer ,we have set this to equal to 0.010 ether you can set it to any value that you want.
- address payable owner is the contract address of the deployer of the marketplace contract.
- mapping is to map a tokenID to a market item and the name of the mapping is idToMarketitem.
 struct MarketItem {
      uint256 tokenId;
      address payable seller;
      address payable owner;
      uint256 price;
      bool sold;
    }

    event MarketItemCreated (
      uint256 indexed tokenId,
      address seller,
      address owner,
      uint256 price,
      bool sold
    );

    constructor()  {
      owner = payable(msg.sender);
    }
Now make a structure for the MarketItem and specify the properties that every marketItem should have ,Let’s take a look at the struct parameters one by one
- token Id
- address of seller
- address of owner of nft
- price of nft
- a bool to check whether the nft got sold or not
After this we made an event with the same properties, Events in solidity are ways to communicate with a client application or front-end website that something has happened on the blockchain.
After declaring the event we wrote the definition of constructor ,the constructor will get executed only once in the lifetime of the contract
In the constructor we have made the deployer of the smart contract the owner of the marketplace, it means that the address that we deploy our contract with , becomes the owner of the marketplace and all the the amount from the listing fee and commission from buying and selling the nfts from the platform comes into this account.
Creating a new NFT on the marketplace for sale
 function createMarketItem( uint256 tokenId,uint256 price) private
    {
      require(price > 0, "Price must be at least 1 wei");
      require(msg.value == listingPrice, "Price must be equal to listing price");
        idToMarketItem[tokenId] =  MarketItem(
        tokenId,
        payable(msg.sender),
        payable(address(0)),
        price,
        false
      );
      _transfer(msg.sender, address(0), tokenId);
      emit MarketItemCreated(
        tokenId,
        msg.sender,
        address(this),
        price,
        false
      );
    }
- we have created a function createMarketSale that takes the tokenId and price of that tokenId .
- Inside the function,it is being checked that the price must be greater than 0, it is to check that the NFT is not listed for free .
- The second require statement is to check that the person who is listing the NFT for sale is also sending the listingprice for the marketplace.
- After this, we map the properties of our NFT to a tokenId .
- Then we transfer the ownership from the owner of the NFT to the marketplace smart contract so that the contract can transfer the ownership to the one who buys this nft from the marketplace.
- Then at last we emit the event and the market item is created.
function createToken(string memory tokenURI, uint256 price) public payable returns (uint) {
      _tokenIds.increment();
      uint256 newTokenId = _tokenIds.current();

      _mint(msg.sender, newTokenId);
      _setTokenURI(newTokenId, tokenURI);
      createMarketItem(newTokenId, price);
      return newTokenId;
    }
Now, we create a function that will mint the NFTs .
It takes the tokenURI and price of the NFT as the parameters ,then increment the tokenID so as to store the new token and then call the _mint and _setTokenURI function from the openzeppelin IERC721 contract then call our createMarketItem function to list this nft on our marketplace.
Selling the NFT
In this lesson we will write the logic on making a sale on the marketplace in which we will look at how to transfer ownership and funds between both parties.
    function createMarketSale(uint256 tokenId) public payable {
      uint price = idToMarketItem[tokenId].price;
      address seller = idToMarketItem[tokenId].seller;
      require(msg.value == price, "Please submit the asking price in order to complete the purchase");
      idToMarketItem[tokenId].owner = payable(msg.sender);
      idToMarketItem[tokenId].sold = true;
      idToMarketItem[tokenId].seller = payable(address(0));
      _itemsSold.increment();
      _transfer(address(this), msg.sender, tokenId);
      payable(seller).transfer(msg.value);
    }
- This is a payable function it means that when we call this function we need to send funds with it
- It takes the tokenID of the NFT as a parameter .
- Then it sets the price and seller variable to the NFTs seller and price.
- require statement will check that if the amount that came with the function call is equal to the NFT price set by the seller or not
- Then this function sets the owner of NFT to the msg.sender means the buyer.
- Sets the boolean value sold to true and also sets the address of the seller to an empty address because the nft is now being sold
- Then it calls the _transfer function so as to transfer the ownership of NFT from the marketplace contract to the buyer
- Then the transaction occurs in which the seller contract gets the listed price for his/her NFT.
Some Advanced functions
The function to fetch all the unsold market items so as to list them in the market.
    function fetchMarketItems() public view returns (MarketItem[] memory) {
      uint itemCount = _tokenIds.current();
      uint unsoldItemCount = _tokenIds.current() - _itemsSold.current();
      uint currentIndex = 0;

      MarketItem[] memory unsolditems = new MarketItem[](unsoldItemCount);
      for (uint i = 0; i < itemCount; i++) {
        if (idToMarketItem[i + 1].owner == address(0)) {
          uint currentId = i + 1;
          MarketItem storage currentItem = idToMarketItem[currentId];
          items[currentIndex] = currentItem;
          currentIndex += 1;
        }
      }
      return unsolditems;
    }
This function takes an array of MarketItems as a parameter
- The first variable itemCount gives the count of the total no of items that have been created in the marketplace.
- The second variable unsoldItemCount subtract the sold items from the total items created.
- The currentIndex keeps a count of the current index.
- Now we create a new empty array unsolditems to keep a count of unsoldItem. The new empty array items is of the type MarketItem .
- Then we run a for loop and in the loop we check if the owner of the tokenID is an empty address if the condition is true it means that the item is unsold then we increment the currentId
- Then we declare a new variable of the type marketItem and store the information of the marketItem with tokenID equal to currentID.
- Then take our empty array and store the value of unsold item in it.
- Then we return the unsolditems array.
The User Functions
The function to return user’s purchased NFTs
    function fetchMyNFTs() public view returns (MarketItem[] memory) {
      uint totalItemCount = _tokenIds.current();
      uint itemCount = 0;
      uint currentIndex = 0;

      for (uint i = 0; i < totalItemCount; i++) {
        if (idToMarketItem[i + 1].owner == msg.sender) {
          itemCount += 1;
        }
      }

      MarketItem[] memory purchaseditems = new MarketItem[](itemCount);
      for (uint i = 0; i < totalItemCount; i++) {
        if (idToMarketItem[i + 1].owner == msg.sender) {
          uint currentId = i + 1;
          MarketItem storage currentItem = idToMarketItem[currentId];
          purchaseditems[currentIndex] = currentItem;
          currentIndex += 1;
        }
      }
      return purchaseditems;
    }
The function to return user’s listed for sale NFTs
    function fetchItemsListed() public view returns (MarketItem[] memory) {
      uint totalItemCount = _tokenIds.current();
      uint itemCount = 0;
      uint currentIndex = 0;

      for (uint i = 0; i < totalItemCount; i++) {
        if (idToMarketItem[i + 1].seller == msg.sender) {
          itemCount += 1;
        }
      }

      MarketItem[] memory forSaleitems = new MarketItem[](itemCount);
      for (uint i = 0; i < totalItemCount; i++) {
        if (idToMarketItem[i + 1].seller == msg.sender) {
          uint currentId = i + 1;
          MarketItem storage currentItem = idToMarketItem[currentId];
          forSaleitems[currentIndex] = currentItem;
          currentIndex += 1;
        }
      }
      return forSaleitems;
    }
The last lesson
We have completed writing the marketplace smart contract .I hope that you have understood all the functions and logic that goes behind making a NFT marketplace.
The full code for your reference is here:
// SPDX-License-Identifier: MIT
pragma solidity ^0.8.4;

import "@openzeppelin/contracts/token/ERC721/IERC721.sol";
import "@openzeppelin/contracts/utils/Counters.sol";
import "@openzeppelin/contracts/security/ReentrancyGuard.sol";

contract Marketplace is ReentrancyGuard {

    using Counters for Counters.Counter;
    Counters.Counter private _tokenIds;
    Counters.Counter private _itemsSold;

    uint256 listingPrice = 0.010 ether;
    address payable owner;

    mapping(uint256 => MarketItem) private idToMarketItem;

 struct MarketItem {
      uint256 tokenId;
      address payable seller;
      address payable owner;
      uint256 price;
      bool sold;
    }

    event MarketItemCreated (
      uint256 indexed tokenId,
      address seller,
      address owner,
      uint256 price,
      bool sold
    );

    constructor()  {
      owner = payable(msg.sender);
    }
 function createMarketItem( uint256 tokenId,uint256 price) private
    {
      require(price > 0, "Price must be at least 1 wei");
      require(msg.value == listingPrice, "Price must be equal to listing price");
        idToMarketItem[tokenId] =  MarketItem(
        tokenId,
        payable(msg.sender),
        payable(address(0)),
        price,
        false
      );
      _transfer(msg.sender, address(0), tokenId);
      emit MarketItemCreated(
        tokenId,
        msg.sender,
        address(this),
        price,
        false
      );
    }
function createToken(string memory tokenURI, uint256 price) public payable returns (uint) {
      _tokenIds.increment();
      uint256 newTokenId = _tokenIds.current();

      _mint(msg.sender, newTokenId);
      _setTokenURI(newTokenId, tokenURI);
      createMarketItem(newTokenId, price);
      return newTokenId;
    }

    function createMarketSale(uint256 tokenId) public payable {
      uint price = idToMarketItem[tokenId].price;
      address seller = idToMarketItem[tokenId].seller;
      require(msg.value == price, "Please submit the asking price in order to complete the purchase");
      idToMarketItem[tokenId].owner = payable(msg.sender);
      idToMarketItem[tokenId].sold = true;
      idToMarketItem[tokenId].seller = payable(address(0));
      _itemsSold.increment();
      _transfer(address(this), msg.sender, tokenId);
      payable(seller).transfer(msg.value);
    }
    function fetchMarketItems() public view returns (MarketItem[] memory) {
      uint itemCount = _tokenIds.current();
      uint unsoldItemCount = _tokenIds.current() - _itemsSold.current();
      uint currentIndex = 0;

      MarketItem[] memory unsolditems = new MarketItem[](unsoldItemCount);
      for (uint i = 0; i < itemCount; i++) {
        if (idToMarketItem[i + 1].owner == address(0)) {
          uint currentId = i + 1;
          MarketItem storage currentItem = idToMarketItem[currentId];
          items[currentIndex] = currentItem;
          currentIndex += 1;
        }
      }
      return unsolditems;
    }

    function fetchMyNFTs() public view returns (MarketItem[] memory) {
      uint totalItemCount = _tokenIds.current();
      uint itemCount = 0;
      uint currentIndex = 0;

      for (uint i = 0; i < totalItemCount; i++) {
        if (idToMarketItem[i + 1].owner == msg.sender) {
          itemCount += 1;
        }
      }

      MarketItem[] memory purchaseditems = new MarketItem[](itemCount);
      for (uint i = 0; i < totalItemCount; i++) {
        if (idToMarketItem[i + 1].owner == msg.sender) {
          uint currentId = i + 1;
          MarketItem storage currentItem = idToMarketItem[currentId];
          purchaseditems[currentIndex] = currentItem;
          currentIndex += 1;
        }
      }
      return purchaseditems;
    }
  function fetchItemsListed() public view returns (MarketItem[] memory) {
      uint totalItemCount = _tokenIds.current();
      uint itemCount = 0;
      uint currentIndex = 0;

      for (uint i = 0; i < totalItemCount; i++) {
        if (idToMarketItem[i + 1].seller == msg.sender) {
          itemCount += 1;
        }
      }

      MarketItem[] memory forSaleitems = new MarketItem[](itemCount);
      for (uint i = 0; i < totalItemCount; i++) {
        if (idToMarketItem[i + 1].seller == msg.sender) {
          uint currentId = i + 1;
          MarketItem storage currentItem = idToMarketItem[currentId];
          forSaleitems[currentIndex] = currentItem;
          currentIndex += 1;
        }
      }
      return forSaleitems;
    }
}
Now the solidity part of the Marketplace is complete .
You can experiment with this knowledge you got in this course.
You can make an opensea clone with your frontend knowledge or you can make a portal for music artists to list their song as NFTs or some other solution that you have in mind
The possibilities are endless ,whatever you make showcase your solution to the world and dont forget to tag me @sidtexh in your posts on twitter ,I will be your biggest cheerleader
I hope that this lesson made you smart and more versed in solidity and web3 development
Happy buidling
See you again!